Saturday, October 17, 2020

Even more about protective covering......

Wargaming

Last time I wrote about protective covering, I wrote about how to protect your litte soldier's paint job. If you're using your troopers for wargaming you'll want to protect them for being spottet and shot at by their enemies as well. This cover can be buildings, bunkers, strongpoints, sandbag positions, foxholes, (abounded) vehicles, bombshell craters, hills, rocks, trees, woods, vegetation and general "clutter". -Anything that can give them some needed protective covering and concealment during the battle. If you're gaming outside, its pretty easy to give them both concealment and protective cover, as the nature will take care of that just like the real thing. I live in Norway and playing gaming outside is not an all year activity, so I prefer to be inside.
Making own terrain for wargames
Outside you can easily add cover, and the scenery looks good.


Tabletop gaming

As many of you using your soldiers for wargaming inside already may be familiar with, is that 'Tabletop (war-) gaming' is ,by it's nature, pretty flat. It's limited how hilly scenery that can be created on a tabletop, and easily stored away when not in use. To add some interest and challenges to the otherwise flat tabletop, some kind of covering to prevent being seen or hit by enemy fire is most useful and needed. Suitable covering can be improvised and made by easily, cheap and accessible things that you have to hand, and can be virtually anything. Or you can use items more adapted for your army men.


These photos were taken during my very first wargame as I wanted to try it out. I used unpainted plastic soldiers and things I could easily find at home; my kids' obsolete Moomin playhouse, books for hills, a folded ruler for a wall, cut down toilet-dowels for foxholes and coffee capsules for low vegetation. The game was good fun though, and I decided to paint my soldiers for a start. Then it's just escalated...

Making own terrain for wargames
Even in the "toybox" usefull items for wargaming can be found and customized. I've descirbed how I repainted those two vehicles in the front in an earlier post, and det Beetle in the back needs som heavy weathering and will act as cover. The bushes are form an old farm set.

Playsets

If you buy your army men in cheap 'playsets' in boxes or buckets, you usually get some 'scenery-items' such as bunkers, trees, sandbagpositions, fences and czech hedgehog along. They are not 'finescale' and they are often hollow with molded details on only one side. If you paint them, they can look pretty good.
Making own terrain for wargames
The fences, sandbags, ruin and the czech hedgehogs were obtained from the two playsets in the background and painted.
Once upon a dice in the west
When I tested my own "homebrew" rules (Once upon a dice in the West), I covered the table and books with a suitable sandcoored cloth. The fences, cactuses, trees and a wagon were from old playsets. The building and well is from my old 'toybox' and were made in Western Germany by Vero back in the 70ies. The figures are Britains Deetail and are from my old toybox as well.

Some Playsets or scenery items are available from more established plastic soldiers manufactures like for instance Airfix, but are usually a little more expensive and harder to get. The availability is nothing like it was back in the 'good old days' unfortunately.
Making own terrain for wargames
Two buildings fromAirfix' 1:32 scale range. They've been around since my childhood and I'm found of them even if they have very thin walls for such buildings in such a scale. I'll let them giver my troopers a cover-save.

Plastic kit manufactures

If you are into 54mm or 1:32 scale plastic soldiers, you can find a lot of useful accessories and kits from different main 1:35 scale manufacturers like for instance Italeri and Tamyia. Being kits they are usually more expensive, but you can be lucky to find them really cheap on close-out sales, at sale-stands at exhibitions or simply secondhand from fleamarkets etc. 

I know of one exception to this, and that is Amera Plastic Mouldings who makes some cheap scenery items in 1:32 or 1:35 scale in vac-u-formed plastic. I haven't tried them out (yet).
Making own terrain for wargames
All these kits are 1:35 accessories from Italeri. Kits are usually more fragile and expensive than the other options in this post, but these I found very cheap at a second-hand market. I've not  come around to repaint that shed in the midle back yet, and I also plan to build that well soon.


DIY

There are a lot of resources on the internet that shows you how to turn cheap and available items into good looking scenery-items for your wargaming and plastic soldiers. On Youtube there are some online 'clinics' showing you how to do it as well, and one om my favorites is Mel 'The Terrain Tutor'.
Making own terrain for wargames
The rock-formations are made by cut and painted blue styrofoam pieces, and glued to old CD-discs I'm done watching. The light and moss are Christmas-decorations from the craftshop modified to suit my purpose. The burnout marker I built from a discripton from The Terrainturor on Youtube:


DIY with paper

On the internet you can usually find a lot of free and downloadable paperkits which you can just print to get useful scenery-items for your tabletop gaming. For their games intentionally, Combat Storm use to have a couple of buildings, some walls, sandbagpositions, cars and containers free to download from their page. Another suitable free of charge printable models in 1:35 scale and just about right for "Armymen-scale" are the easy to build military vehicles from Dave's Card Creations. I especially like the M113 APCs and HUMMVs. And here you should be able to find several free building kits. One advantage with these is that they can be resized to your needs before you print them.

DIY in plastic

This is a what this blog-post was really to be about, and a very new chapter to me. Due to other needs in our family, my family bought a 'cheap' 3D-printer. When not in use for it intentional purpose, I got curious if it was usable for my hobbies being wargaming with toy soldiers, model railroading or RC-hobby as well. After a visit on Thingeverse, a website with thousands of files of models you can print for free for your own use, I was not in doubt anymore; There are a lot of different useful (everyday) gadgets there, but also literally thousands of files that can be printed into 'scale models' as well. You are not limited to print just scenery items as I've done in this post, as vehicles, figures, gaming miniatures, tokens, markers, dicetowers and even "hill-kits" are available on Thingeverse as well. I decided to take on my wargaming as I wanted more covering items and scenery for my otherwise flat tabletop.
Making own terrain for wargames
Here is a selection of what I've been printing so far. I'm not completly done yet for my 54mm wargaming, and have a model printing while I'm writing this.

There are actually not a lot of files scaled specific to 1:32, 1:35 or 54mm on Thingeverse. I discovered that many files/models for tabletop gaming was scaled to 1:56/28mm, 15mm or not to a specific scale at all. Since I wanted to use this to get my 54mm soldiers reviewed earlier in this blog, items they could take cover behind during 'combat', I simply edited and scaled the 28mm and 15mm files/models I wanted up to 1:35 scale. A 28mm model scaled to 160% is about 1:35. The reason for this is that our printer has a limited print-bed to 14x14x14 cm, and my 'Matcbox clones' are probably closer to 1:35 than true 54mm scale anyway. Besides, when you scale up models you use a lot more filament/plastic when you print them. Printing to 1:35 instead of 1:32 saves a little plastic, and is notable when you print many models. This is another advantage with printing your own In the scenery; You only print what you need, as you don't have to buy a whole 'set' to just get some of the parts in it. In the long run this will save you for both money and space taken up by items you really didn't need.

Large models usually comes in several files, and you have to print them separately and assemble them as a kit at the end. What to do when you need larger parts than the printbed on your 3D-printer can accommodate? As you can edit and scale files and models up and down, you can also edit it by cutting it up i pieces and print them separately and joint them together afterwards.
Making own terrain for wargames
The models on the top row are multiple files printed separatly and joined in the end. The wreck on the bottom row was to large for my printer when I scaled it up to about 1:35 scale, so I just "cut" the file in 4 and printed them separatly. It was very easy. 

So what does it costs? When we bought our printer it costed about $ 498, £ 385 or EUR 422. Now days you can get them even cheaper if you wants to assemble it like a kit yourself. Another thing you'll need is filament, the plastic you need for printing. We use a PLA-filler which is non-toxic or with no (harmfull) fumes. One roll of about 200m of PLA-filament costs about $ 20, £ 15 or EUR17 here. How many models you can get out of each roll of filament is depending on scale and size on the models you want to print. These models in approx 1:35 scale are printed from the same roll of filament:
Making own terrain for wargames
And it's still some filament on the roll, I can use for smaller models.

On the downside it takes some time to get your models. Much longer time than go to the store and buy one. First you have to use time finding the models you want to print and then further time editing (converting the file in a slicer) the file before printing. Printing takes (a lot of) time, and it's more time consuming to print larger models than smaller models. And it takes even longer time if you print in thin layers. Now I seriously consider to start wargaming i 1:72 scale, as it will save time and plastic, and give more models for each roll of filament. 
Making own terrain for wargames
Patience is needed! The barrels to the left took 7 hours and 5 minutes to print. The L-shaped sandbagposition down at the right, just over 5 hours, and  the 1. floor of a larger building to the top right about 12 hours and 13 minutes (!) Due to the heat involved you can't just leave it over night or do it while at work...

I know some are skeptic to 3D-printed models due to the printinglayers, as can be seen as small lines in the model. -Especially on slopes. Thicker the layers, the more visible they become. Despite this, many printed models have good details and looks realistic, and I think they will look even better when painted. And unlike some playsets items, They have 'depth', thickness and details on all sides. You can print smaller and sharper objects and details if you buy a even more expensive 3D-resin printer with even more expensive filament, but that's not for me. I hope to find a easy way as I think it's too time-consuming to sand them smooth afterwards. Perhaps priming with car body filler on rattle-can will work?

You can still get 3D-prints even if you don't have a 3D-printer. If You don't have a friend with a 3D-printer and a lot of time, who'll let you use his or her printer, you can buy ready 3D-printed models from Shapeways. Often you can get them resized to your need as well, but do check the price first! Mostly if reasonable priced, but a few times I've found some models on Shapeways which I've also found for free on Thingeverse, but the difference is that on Shapeways it costs about the same as 4 full rolls of filament (!). Perhaps their printquality justifies such a price?

Conclusion

Is this a really cost-saving way of modelling? To buy a 3D-printer is not cheap, even thou the price seems to decrease with time. You can get a very decent printer for a fair price, but is still seems to be a big expense for many of us to buy it in the first place. 

If you do buy one, you'll not have very many other expenses to it (as they are straight forward to maintain) except for buying filament for printing your desired models. One benefit is that you can find files and models to use and print for free on for instance on Thingeverse, and there are a lot of other websites with free 3D-models as well. Just be aware that it's not legal to print free models from Thingeverse to sell them commercially, and probably not from any of the other sites as well. You'll save money on buying models, as you don't have to buy as many anymore because you print them your self. -And you only need to print what you actually need, so you don't end up with a lot of 'extras'. 

Another benefit with 3D-printing is that I can use it for my other (modelling) hobbies as well. I can use it for my model railroad hobby (luckily I'm mainly modelling in H0 1:87 scale) and I'm not very tempted to try to print something for my RC-car as they mostly are in 1:10 scale. I'm considering to maybe try other wargames as well, since new gaming miniatures suddenly became very available with this printer. So I can use it more on my other modelling purposes, and I think that is the key to consider if this is a cost-saving way of modelling; If you only need a few models, it'll be more expensive than you saves. But if you needs many models I think you'll save a lot of money in the long run despite the initial cost.
Making own terrain for wargames
Here is a selection of other useful items I've printed either for using or testing. I've always wanted a dicetower, and this one is quite large and heavy and have 4 bafflers inside. The two small buildings on the left of the tower are H0 scale (1:87) for my odel railway. So are those two figures closest to them as well. The buildings turned out fine, but the figures was just too small to look good with our simple printer. The Stormtrooper to the left of them are printed to different scales as a test. The largest one is 54mm and the smallest is 1:87. In the middle from left to right is 28mm and a 1:72 scale version. I actually think that the 28mm version looks the best of them. At the very back is G-scale figures (1:22,5 scale) for my garden railway, and printed to look our little family. I'm the one to the left. To the right in the picture is a couple of 54mm figures and test prints of weapons so I can customize regular Army Men. The two weapons at the top are actually "Lego"-guns, but they look just right when scaled to correct size. I wrote about them in my previous post. 

Is it complicated? -No, you don't need a degree to to this; it's very easy to learn how to use it. My wife was able to handle our 3D-printer after just browsing the manual, and it was actually her that sat it up.

If I was to buy a 3D-printer again, would I've done other considerations? Yes, I would considered a printer with a heated printbed (keeps your model level), accepting more than just PLA-filament, and could print a little larger than just our 14x14x14 cm. It would be nice to be able to print very small and detailed parts on a resin-printer for my model railroad, but the price can't just justify it as I don't need that many models.

Eventhou I've got fascinated by this, I'm not turning this blog into a blog about 3D-printing. For me it's just another modelling tool. -But a usefull one, because there are not very much plastic soldiers, accessories and wargaming scenery easily available in Norway, and ordering them from abroad is expensive due to tax-rates, customs and shipping. I just wanted to share my experiences so far, both possibilities and limitations, so you can make up your own mind if it's a good thing or not. I think I'm going to be busy for a while now painting all these items I have printed a during all this time in 'Home isolation' due to Covid-19. I should be covered now, so maybe I'll try to print something else for my wargaming scenarios next time. -When patience strikes.

Stay home and stay safe!
Making own terrain for wargames

Saturday, September 26, 2020

A tip for a simple conversion

Where are they when you need them?

As I'm intending to use my previously reviewed Toy Story Army men for wargaming, I'm organizing them into rifle squads/sections. But to so in a propper way, they actually miss one thing which most rifle squads have; a machinegunner armed with a a LMG. The 'Bucket O Soldiers' didn't contain any such figures.

army men conversion for wargame
The two sections are kind of large (at least bigger than a Norwegian section of 8 men), and can be divided in to even more fireteams. A LMG might get usefull for them


Make a not so useful figure more suitable for your needs...

As I wanted my new machinegunners to match the rest of their squad in both style and size, I decided to convert some of the other Toy Story figures left in the bucket for this purpose. Since I've used most figures for different purposes, there wasn't so many left to choose between. I had some engineers with mine-detectors left, as they are not so useful for my type of wargaming. Besides, their position is not that bad for a soldier carrying a LMG (at least not for a "links-shooter").

army men conversion for wargame
Still in a Classic style and pose


...And arm him with "Lego"...

The next challenge was to find a suitable LMG to arm them with. I keep leftovers from kits in a box full og bits and pieces, but my guns there were mostly 1:35 scale. I found them to small, as the Toy Story-soldiers are bigger. To buy other kits just to get the machineguns wasn't tempting, but on Thingeverse I found a lot of 3D-files for free to print. I also found a huge selection of different weapons there as well. As I was able to print some files from Thingeverse (more on that in a later blog-post), it was just to take a pick. 

Even though their generic, green and tan "imagiNATION" style, I kept Norwegian soldiers in mind making the UN-troops. Therefore I wanted to arm them with a machinegun used by Norwegian Armed Forces. As the MG3 was one of my favorites from my own service, it had to be one f those. It is very similar to the WWII German MG42, so it was easy to find some models/files on Thingeverse. I had to try to print different files of the MG42, as not all of them came out successfully due to the small size. I found a "Lego MG42" for "Lego Minifigs Wargaming", and resized it to 1:32 scale. It was a robust model and turned out quiet well, so I printed 2 models with both folded and unfolded bipods. I kept the drum magazine on, as it enables the LMG to be operated by 1 person and will be an advantage in wargaming.

Printed in both black and white PLA-plastic with bipods both folded and unfolded.


Now the soft, oily plastic the soldiers are made from became handy, as I was able to bend the left arm on one of them easily by hot water. The other one I kept a little different deliberately to get a slight variation. With the LMGs fitted, my soldiers became wobbly due to their small original base and added weight. Back at Thingeverse I found different bases and resized and printed one of them. Now they stands steady.

army men conversion for wargame
Don't look to good yet, as some putty and glue is still visible


Finishing touches

Painting is straight forward, nothing new here. Washed, primed, painted, and sealed with Mod Podge directly this time. 

army men conversion for wargame
Primed and ready
army men conversion for wargame
I tried to add further variations as some of the drum magazines looks different from different manufacturers. Some MG3s uses old and new parts, and some even has old MG42 parts. That's why I gave the soldier to the right an older 'brownish' bakelite sholderstock to his weapon.

army men conversion for wargame
A quick wash and drybrush brings out the few little details that these 'smooth' figures has.


Now they're ready to team up with their BIA and complete their squads, and probably for some action as well....


Wednesday, June 17, 2020

In war (-gaming) your soldiers needs protective cover!

Tired of army men loosing their paint?


Perhaps you have experienced that your Army men  starts to loose their paint after a while, and ruins your paintjob? Especially if they're regulary handled and if you use them for wargaming. That happened to me. After a just a few gaming sessions my painted plastic soldiers earlier mentioned in this blog, was starting to take their toll and the paint started to flaking (!). It was actually worse on the soldiers from the 'Toy Story'-collection as their plastic seemed softer and 'oilier' than their Matchbox-clones Brothers in Arms (which had harder plastic and took primer and paint better).

As I have a 'budget-approach' to wargaming, I painted them with cheap acrylic paint  from the craft store. This paint works fine with my model railroading, but was it also usable for miniatures which shall withstand some handling during gaming? I was not sure, so therefore I initially followed 'The book' here and washed them, primed them (twice as the first coat was with plastic-primer), painted them and sealed them flat clear varnish. Despite of this the paint was still coming off shortly after some handling:
coating toy soldiers with Mod Podge
This one was the most heavily attacked. It does not look good!!

The solution

So, how could I provide some First Aid quickly and save my plastic army men? I found a possible solution with another product from the craft store. In model railroading I've been using (Matte) Mod Podge for scenic glue and sealant. This dries without the slight shine often found on PVA-glues, so I decided to give the Matte Mod Podge a try as a varnish for my miniatures. If you want flat figures, it's important that you go for the Matte Mod Podge and not the 'glossy' or semi-shine versions:
coating toy soldiers with Mod Podge
Still wet of a cover of Matte Mod Podge (yes, it IS Mod Podge!!) it still doesen't look too good...

First I tried a thin layer of Matte Mod Podge as a varnish, and found out it turned out pretty flat and transparent and gave a resistant and flexible surface. It still had a slight shine to it.

I wanted to try to make the surface even more durable and resistant and tried a thicker coat of Mod Podge. After it dried, the figure was still pretty flat but with a slight more shine to it. The coated surface felt very durable yet still completely transparent and flexible:
coating toy soldiers with Mod Podge
This is how (flat) it looks after it's dried after a heavily coat og Mod Podge.
Note that I modified his rifle as well to give it a more generic look of assault rifle like the G3 or from the FN-family. This way they looks even more different that their 'foes' based on the same figures.

Despite the slight shine, the clear cote from Matte Mod Podge is still very flat and your figures are fine if you leave them like this. I wanted a even more 'dull' and 'dead flat' look to them, so I finished them off with a thin overspray of 'Army Painter' "Anti-Shine":
coating toy soldiers with Mod Podge
With a thin coat of Armypainter "Anti-Shine" added

coating toy soldiers with Mod Podge

I'm sure the whole problem with flaking paint can be avoided if you use 'right' primer and  'right' paint or using metal or hard plastic figures. Perhaps Enamels are better suited on stubborn plastic than (cheap) acrylics. I'm also sure there are a lot of other ways to fix it if you run into problems with paint coming off your (plastic) figures. I found my solution and fixed it with a liberate cote of Mod Podge, and it seems to work just fine!
A benefit is that you can buy Mod Podge in craft shops, and it's cheap. Another benefit is that if "glossy figures" is your thing, you can get Gloss Mod Podge as well. I have not tried the glossy version and don't know if it acts differently than the Matte.

For future painting-projects, and especially for figures made of soft plastic, I'm going to coat them with Matte Mod Podge directly. If I still might find them to shiny I'll just give them an additional coat of something very flat, like the Army Painter "Anti-Shine".

Once upon a dice in the west

Budget tabletop gaming

free wargame rules free rpg rules Wild West wargame rules


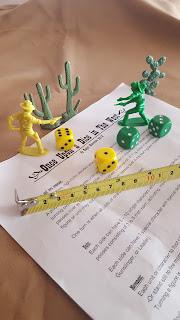
As previously mentioned in this blog, I've found bags of cowboys and indians clones in the store, so cheap that not buying them was actually not an option. I wanted to use them for some kind of tabletop gaming, but for figures this cheap I did'nt want to spend a lot of money on buying rules. -Which often are complicated and take a lot of time to read anyway. I wanted some fast, very simple, skirmish, playable and fun rules which captured the cinematic feeling of western-movies and didn't demand more much more than a tapemeasur and some d6' besides the miniatures.

On 'Whitewash City' I found some links to a lot of both cheap and free Wild West rules, but many rules were no longer available. I ended up with creating a homebrew I named 'Once upon a dice in the west'. Please have a look at them and feel free try them out. Feedbacks  are appreciated.

Friday, May 8, 2020

Veteran's day!

In Honour...

Today it is not only the 'liberation day' and 75 years ago VE-day, but it's also the Nowegian  Veteran's day.

In memory of those who stood up for something much bigger than themselves. All gave some, but some gave all!

I salute you all! Thank you for your Service!!


Friday, April 17, 2020

The good, the bad and the.... -cheap??!!

Cowboys and Indians

Bags of cheap figures

From time to time I've seen these small plastic bags with cowboy and indian figures in different dime stores or in the toy-section in food stores, but they haven't actually caught my attention. Well not before now, as  I found them 'dead-cheap'; only £ 0.80, $ 1.04 or Euro 0.95 for each bag of approximately 24 figures. For a fistful of dollars, I was able to buy some few bags....
There were slightly more Indians than cowboys in each of the 3 bags I got.

cheap chinese copies of Airfix Cowboys
The contens of 3 bags. Not any specific numbers of poses, numbers of Indian/cowboys or cheerful colors in any of them

cheap chinese copies of Airfix Cowboys
The 6 different cowboy-poses. Looks familiar??

The 6 different Indian-poses. Looks familiar too......

The clones and their originals

The figures them selves seems to be clones of the Airfix 1/32 scale cowboys and Indians, somewhat 'smaller'. Maybe actually closer to 1:43 or 40mm scale? Unfortunately there are only 6 of the original 12 poses from both the original Airfix cowboys and Indians available in the bags. Their bases seems smaller and makes them more wobbly. The copies are not as crisp and sharp in the mold as their originals. I don't have any Airfix Indians to compare  them with, but I do have some old, half-painted, well-used cowboys from my childhood to compare them with.

Airfix to the left, and clone to the right.

Again the original to the left, and his smaller cousin to the right


Britains Deetail, Airfix, Chinese copy
Popular pose. Britains Deetail to the right, Airfix in the center, and the clone to the right.

Britains Deetail, Airfix, Chinese copy
This is one of my absolute favorites. Britains to the left, Airfix in the middle, and the copy to the right.


Conclusion

Not as nice as their Airfix originals, but for this price they'll make great gaming pieces. They seems to be pretty common, so wherever you live, you should be able find something similar I think.

With these nice cheap figures, I now only need to find some nice, free, simple and fun rules for (wild west) gaming.....

Tuesday, November 26, 2019

Creating a 'ghost army'

Fog of war in wargames

During battle-conditions there exist a 'Fog of War' due to consealed units and consealed movement of units, which make a complete overview of the battle impossible. This also makes it difficult to make plans ahead, as all enemy positions may not be known. It's said that no plans survives the first encounter with the enemy. Usually when we're playing wargames we automatically have a pretty good overview of the whole battlefield, as we're usually playing on a table or similar, and usually we can see all the enemy units too. Some units may be in cover or behind obstacles, and the different units may therefore not see each other, but the players know they are there, and what kind of unit it is, and it's strength etc.

Fog of war in miniature

There are several ways to incorperate 'The Fog of War' into a miniature wargame and make it even more challenging. Some simply write down a unit's size and whats in it on one side of a small piece of paper, and a unit-number on the other. Then the pieces of paper are laid down on the gaming-table with the unit-numbers "facing up" and the unit's data "facing" the table, and are moved around at the 'speed' of the slowest unit in that numbered unit on the note. This way the players know that there is "something or someone there", but not the exact size or type before it gets in line of sight or close enough to bee seen by other units. When such a unit comes in the line of sight of another unit, they are both exposed and the papernotes for those units are flipped and replaced with the gamingpieces of those units, which are then placed on the battlefield.
Fog of war ghost army

Instead of small papernotes with units numbers, there are another way to move such miniature 'ghost units' around the miniature battlefield. I got some figures left after the army-building from the Tobar-sets reviewed earlier, and decided to use some of them as 'ghost units'. I painted them all solid black, and drybrushed them with khaki. On their stands I painted different numbers, which will go to a reference-note made by each player before the game begins. On such a reference-note each player writes down what kind of unit, size etc. a numbered figure represents. When one such figure are spottet by another or by another enemy unit, the unit (s) is revealed , and all its miniaturesare placed on the battlefield.

Now reconnaissanse units will become usefull in your wargaming, as they will help you to get a better overview of the battlefield and what to expect. This way of adding 'The Fog of War', can be used with a lot of both free and comercial rulesets, eventhough they do not specify a Fog of War"-element in their rules.
The advancing UN-troops are soon to find out who and how many they're facing... 

The 'Fog of War'-miniatures are replaced With the units and miniatures they were reprecenting according to the refrence note made before the Battle.

Tuesday, November 19, 2019

Improvising some Fighting Vehicles for wargaming

Improvised Fighting Vehicle

As I wanted to add further intrests and challenges to wargaming-scenarios, I decided that I wanted to include some vehicles as well. For combat use Armoured Fighting Vehicles (AFV) like tanks, Armoured Personel Carriers (APC) and Infantry Fighting Vehicles (IFV) seems like the natural and best choise. There are avaiable some models in 54mm/1:32 scale for use with Army Men, and if you add  different 1:35 scale military kits to the list, the range become almost limitless. I want to use the models aimed for the Army Men-use since they are sturdier and takes handeling well, often comming ready assembeled and ready to use, and often cost less than the 1:35 scale kits which are often more fragile and takes time to build. My challenge is that 54mm scale ready made AFVs are not easily to find in Norway, and must be obtained thru the internet. As I'm waiting for finding the right and credible models for my generic 'Green vs. Tan'-armies I decided to do as the real army in the meanwhile; I'm improvising some fighting vehicles...

Prototypes for Improvised Fighting Vehicle

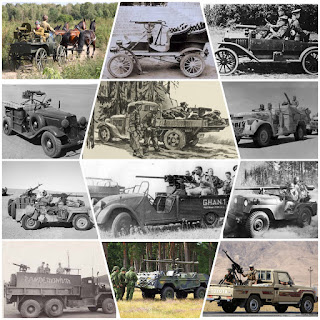
Improvised Fighting Vehicles exists in the real world, and you've probably seen them on the 9 o'clock news; Pickup trucks armed with HMGs, AA-guns, reciolless rifles or some other anti-tank weapons and even missile pods, in use in Libya, Somalia and lately in Syria with the ISIS. These armed Pickups are often refered to as 'Technicals' or sometimes 'Toyota Wars'. The term 'Technical' appeared in Somalia in the 90ies when western organisations there were buying security services from local warlords, and named these expences as 'Technical expences' in their budgets. The somali warlords on the other hand, used their new income to buy Pickup trucks and arm them. The use of Improvised Fighting Vehicles are older than the 'Technical' though, and goes almost back to the vehicle it self, or at least to back when it was possible to combine a civilian or unarmoured vehichle with a machinegun. One of the first might have been the russian Tachankas, a horse-drawn carriage with a mounted machine gun. During the WWI different civilian and unarmoured cars were fittet with machineguns and upgraded to machinegun carriers. During WWII the Long Range Desert Group (LRDG) and british SAS-forces in Africa and Europe used Jeeps and light trucks fitted with machineguns. After WWII several Improvised Fighting Vehicles were used in conflicts in Algeria, Vietnam (Guntrucks), Libya, Tchad, Iraq, and Syria and many are in use with some modern armies today as well.

iprovised fighting vehicles and technicals in history

Does these small, unarmoured 'Technicals' gives any strategic advantages? - Yes, I would say so. They are cheap and easy to get, and you can arm them with whatever weapon available. You don't need special training or skills to drive them, and therefore it's easy to replace crew due to casualties. They run on regular petrol, don't use much, and have a long range and can be repaired with regular tools. They usually have OK offroad capabilities as well. Their weakness is also a strength; They are unarmoured and therefore wounrable, but that also makes them light, fast and very mobile. Experience shows that their best in use in conflicts with low troop density, and wide open landscapes. They provide high mobility weaponplattforms with much firepower and can turn up from a direction their enemy didn't expect. This is a modern 'light cavalry'.

Another example that would probably qualify as an early improvisation of a fighting vehicle happened during the German attack on Norway in april 1940. The poorly equiped Norwegian army was facing one of the world's most modern and mechanized armies in battle. Norway didn't have any Armoured Fighting Vehicles at the time, but the German army had several. Since Norway didn't have much anti-tank weapons at the time either, the German occupation forces only needed to bring light tanks like Panzer I and Panzer II to this campaign. During the battles in Gausdal on 26th of april 1940 Major Brock and a Norwegain force was holding Segelstad bridge, as it was important for a planned Norwegian counter-offensive on the German forces. The Germans on the other side was heavily bombarding the bridge with artillery and mortars from a distance. This made the situation untenable for Major Brock and his men who was located at and by the bridge, and he armed a truck with a heavy machinegun for breaking through the German lines, and  planned to drive to and combat those artillery- and mortar positions. They made the breaktrough, but was later stopped by German forces. Major Brock fell in the following hand-to-hand combat.
andreas hauge drawing of major brock's brekthru
Major Andreas Hauge's drawing of Major Brocs dramatic breakthrough in Gausdal towards Aulestad in april 1940.
And the Norwegian Army still uses a variant of this kind of vehicle. Since it is not a purpose-built combat-vehicle, I assume the the Norwegian Army's 'Multi-Vehicle' is considered a Improvised Fighting Vehicle. The vehicle was made as a offroad-vehicle for both the military and civilian market. When the Norwegian Special Forces in Afghanistan needed a mobile attack-plattform, ordinary Mercedes Gäledewagens was converted for this purpose and armed with a HMG (50. cal), a LMG (MG3), a Carl Gustav 84mm reciolless gun and smoke discharges. It has a crew of 4; The driver, the commander, the HMG-gunner and a loader. They are now in service with the Homeguard.
multikjøretøy
Norwegian army's Multi-vehicle

Improvised Fighting Vehicle for wargame

So there would be suitable to arm my armies with some Improvised Fighting Vehicles while looking for some AFVs to use as well. My best source for looking for usable civilian cars, was through my old toy cars. There I found an about 40 year old Police Pickup truck in about the right size. I removed the police-signs, disassembeled it, painted it, and put it back togheter again. On the truck-bed it's room for placing the standing HMG-figure I converted earlier, among a few other soldiers as well. Now my 'Tan Army' had a 'Technical'.
turning toy car into a technical

Eventhough I've seen it on photos, I didn't want to make a 'Tecnical' for my UN troops. I wanted a more military-style light vehicle for them. In my local toystore I found a Jeep almost the right size. It's a little small, but Jeeps are not large vehicles anyway, and it was also a little too modern for what I wanted. But again, it was available. Again I dissasembeled it, removed some parts, painted it and reassembeled it again. A chopped off figure was placed in the driving seat, and again the earlier converted standing HMG-soldier was placed in the back.
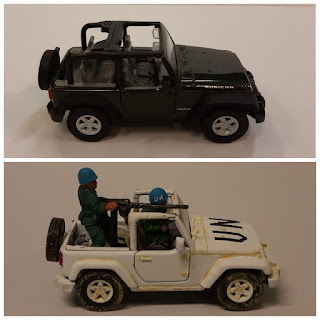
turning toy car into a technical

So, You don't need to have tanks or armoured vehicles to be able to have fighting vehicles to go with your toy soldiers or wargaming, as Improvised Fighting Vehicles are prototypical for a lot of different campaigns, scenarioes and periods. As they are softskins, they are knocked out when hit by heavy weapons. I'm not sure if a singel riflebullet will stop a such vehicle if it doesen't hit anything crucialor the driver directly. -So unless the rules you're plying by adresses this, you should perhaps allow either 10 rifle hits in the cab or bonnet in total, or 5 such hits in one move.


If I finally find some usable AFVs for wargaming, I think I'll need to add a couple of 'Technicals' armed with anti-tank weapons as well. The best of all; You might allready have some of them in an old toybox or you can easily find them in a regular toyshop. It's all about improvising.

You may also be interested in: