 |
| Click for larger image |
One of my other interests other than the military modelling, wargaming and railway modelling is riding my motorcycle. I'm not only riding it a lot just for commuting to work (60 km away), but for recreational rides as well. But motorcycles are a seasonal thing in Norway, as we have long, cold and snowy winters where running conditions are bad or non existent. So when I had to park my motorcycle for the winter in October, I said that when "when one mc-season ends, another one starts..." as I had a couple of indoor motorcycle modelling projects on my workbench for the winter:
 |
| Click for larger image |
The plan was to make a Kettenkrad and a BMW motorcycle with sidecar on my 3D-printer as military loads for 2 flatcars I was going to use for my G-scale Heeresfeldbahn. The Kettenkrad-kit turned out just fine, but the motorcycle with the sidecar did not look good when upscaled and 3D-printed on my printer. Both of them was originally made to 28mm scale as wargame items, but only the Kettenkrad looked acceptable when scaled up to 1:19 scale. The sidecar-motorcycle didn't print well in my 3D-printer and looked so bad and crude that I finally replaced it with a 1:18 scale diecast BMW model I was able to get cheap instead. I was just going to throw away the parts for the 3D-printed one, but somehow I just kept them laying around on my workbench for a while as I could use them for paint tests etc.
 |
The original motorcycle I 3D-printed, but decided not to use.
Click for larger image |
 |
I found this 1:18 scale ready made diecast model instead, which looked the part except for the postwar windscreen and seat. It would be easier to fix those rather than making the 3D-printed model presentable
Click for larger image |
About the same time I went on a trip with my MRC to a model railway exhibition in Germany, where I ended up buying another colorfull LGB flat-wagon, which I could use in my growing Heeresfeldbahn rake:
 |
| Click for larger image |
This wagon was going to need a load to make it look more interesting. After seeing a video on YouTube on how to make tarpaulin loads, I was curious to try out the technique my self, and was happy that I didn't throw away the parts for the bad looking 3D-printed BMW motorcycle with sidecar. It would work as a testpiece for the tarpaulin-technique, as it was ruined anyway. Now I could try to cover up the mistakes literally.
Making a tarpaulin load
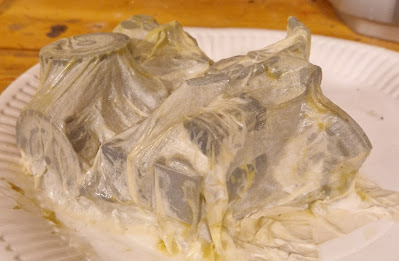
After assembling the motorcycle-model I didn't care to paint it. I just covered it with a sheet of regular tissue-paper (3 layers), and soaked it with diluted PVA-glue (close to 50:50 ratio) using a broad paintbrush to push it into crevices. I started on the highest part of the model, working downwards to the lower parts. I got a couple of rift and tears in the soaked paper, which I just patched up with small tissue- paper pieces and gave them the same treatment, and they blended in perfectly.
 |
| Click for larger image |
 |
| Click for larger image |
 |
| Click for larger image |
Even if ModPodge include som kind of Vinyl, I wanted it to be sturdier against soaking, so I gave it a couple of layers of varnish as well. By now it didn't feel so fragile anymore.
Next it could be painted:
 |
| Click for larger image |
A wash and some drybrushing really brings out the 'details':
 |
| Click for larger image |
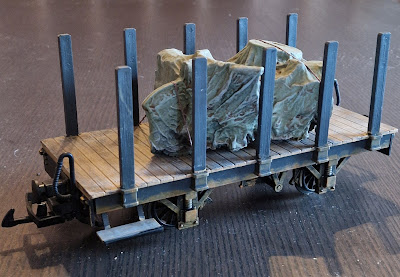
-And finally placed on the (repainted) flatcar. The flatcar was simply painted 'Panzer Grey' with a rattlecan, and drybushed withe some brown acrylics.
 |
| Click for larger image |
 |
| Click for larger image |
That motorcycle looks much better now hidden under a tarpaulin. Throw away nothing, your scrap can be hidden under tarpaulin and be uses as loads or terrain-pieces in wargaming.
This was a fun and quick build and made me feel confident to make more such tarpaulin loads in the future. Just by following the instructions from the YouTube video, this technique worked the first time. Have a try for your self.
Did I mention that I like motorcycles?
 |
| Click for larger image |
My LGB Heeresfeldbahn rake so far:
 |
| Click for larger image |


.jpg)


No comments:
Post a Comment